Tortoise Incubators: Dry vs. Water-Based Systems
Tortoise Incubators: Dry vs. Water-Based Systems

Introduction:
Every breeder who takes tortoise breeding seriously eventually faces the question of how and where to hatch their baby tortoises. Experiencing little hatchlings breaking out of their eggs is one of the greatest joys in the hobby. However, there is a major challenge – European tortoises cannot hatch freely in our climatic conditions without assistance. Therefore, we have no choice but to purchase or build our own incubator.
If you breed multiple species in larger quantities, you will soon find that the incubator runs almost non-stop with eggs continuously inside. Therefore, it is essential to emphasize quality and reliable operation. I know of no greater stress than an incubator full of eggs failing mid-season. Rather than presenting an exact manual for building from scratch, I share my long-term practical knowledge, possibilities, and potential pitfalls in building and operating tortoise incubators.
Here I will discuss devices that my colleagues and I have tested directly in practice—in most cases, these are custom-built incubators. They can be divided into two basic categories:
1. Dry Incubators
In these devices, temperature is usually maintained by a Peltier element (capable of both heating and cooling), managed by precise electronics where temperature and humidity can be finely tuned. They can be used for incubating all land tortoise eggs, but given their parameters and higher cost, they are more suited for complex incubations of demanding species.
Advantage: The main advantage is absolute precision in measuring and maintaining temperature. Temperature fluctuation in a quality unit is only about 0.5 °C and humidity within ±5%, representing top-tier performance.
Disadvantage: The biggest vulnerability occurs during power outages. The temperature inside drops to room ambient level within a very short time, which can be fatal for the eggs.
Heating Cable:
When building a dry-type incubator, a heating cable can be used as a cheaper, widely available heat source. Construction requires a polystyrene box with the cable woven through the upper section and lid. A water container is placed at the bottom to maintain humidity, alongside the egg container. A thermostat and thorough testing before first use are mandatory. Ventilation can be easily managed with small holes in the box.
Advantage: Inexpensive and simple home solution; no need to worry about water condensation dripping directly from the lid.
Disadvantage: Just like the previous option – during a power outage, polystyrene alone cannot retain heat for long.
1. Peltier Element

2. Incubator with Peltier Element and Computer Control

3. Heating Cable Without Regulation

2. Wet / Water-Based Incubators
These are widely used by breeders for their simplicity, efficiency, and immense reliability. Personally, I have 2 self-built water incubators with a total capacity of around 300 eggs. Water heating is provided by an aquarium heater. Fully submersible heaters are ideal (such as reliable Jäger heaters with an adjustable range of 18–34 °C). For larger incubators, it is best to use 2 heaters – one as primary and the second as a 100% backup in case of failure.
How to build: We need an aquarium of any size based on estimated egg capacity (always leave room for expansion). The outside must be thermally insulated, ideally by gluing at least 3 cm thick polystyrene panels. Inside, place a waterproof object (e.g., a brick) roughly 5 cm high, on which the egg container rests. Keep the water level at most 0.5 cm below the bottom of the upper egg tray. A gap of at least 3 cm must be maintained around the egg tray on all sides to allow warm air to circulate freely.
Important: Above the eggs, it is absolutely necessary to place a slanted surface (e.g., a glass plate or plastic cover) so that condensed water safely flows back into the water bath. Water dripping directly onto tortoise eggs is undesirable (with rare exceptions)!
What heater wattage to choose? For 25 liters of water, I recommend about 50 W of power. A heater that is too powerful heats the water too quickly and stepwise, leading to incubator overheating and large temperature fluctuations.
Placement of aquarium heater and grid

Slanted glass plate against dripping water (with handle)

Option to add multiple shelf levels as needed
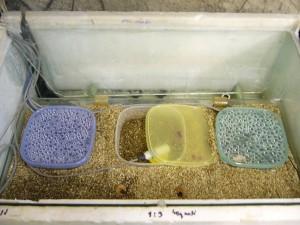
Alternative water incubator design (front-access)

To measure internal temperature, stay far away from cheap Chinese digital thermometers (they are chronically inaccurate). Get a quality, ideally calibrated thermometer and measure temperature precisely at the height where the eggs lie. Gradually adjust the aquarium heater until air temperature stabilizes at the ideal point (e.g., for T. hermanni, graeca, and marginata within a safe range of 30–32 °C). Let the incubator run empty for a few days in a test run before inserting actual eggs. Humidity in water-based incubators does not need to be artificially managed; it automatically stays optimal for these species throughout incubation.
Advantage: Easy and affordable setup. Another massive plus is the thermal inertia of water! If a power outage occurs, the mass of warm water keeps internal temperatures stable for up to 5 hours before slowly dropping.
Disadvantage: Very few. You occasionally need to check and refill evaporated water (otherwise the heater could burn out). Due to extremely high humidity (over 90%), this type is unsuitable for eggs requiring a drier microclimate.
Advanced Controllers for Pro Incubators:
Those who require strict night drops (as in nature) or extreme temperature precision to target specific hatchling genders must equip their incubator with smart, highly accurate regulators. In these setups, controllers are often duplicated—one monitors the other as a fail-safe, while the internal heater is turned to maximum. Although more costly, advanced technology is indispensable for targeted, high-success hatching.
Duplicated professional controllers for precise regulation


Conclusion
Countless designs exist for various types of incubators. DIY enthusiasts often use discarded refrigerators, freezers, or even microwaves as external shells. Ultimately, it is just about the thermal insulation. The core principle of heating and regulation does not vary much. Whether using a simple light bulb, an aquarium heater, or a technologically advanced Peltier element – the result and reward after that tense waiting period are always the same: our tiny baby tortoises!


Copyright ©